


Table of Contents
Exercises for arthritis of the hip are therapeutic workouts and stretches recommended for you by your healthcare provider. They are designed to help you manage the debilitating painful restrictions and functional impairments that may come with arthritic hip joints when done correctly.
Exercise has been recognized as an integral part of your hip arthritis management plan without which symptoms could get worse. This fact holds whether the cause of hip arthritis is due to a degenerative hip disease like osteoarthritis or an autoimmune disease like rheumatoid arthritis.
Is exercise good for arthritis of the hip?
Research has proven the effect of exercise therapy on improved function and range of motion in patients with hip osteoarthritis.1 These exercises could be done on land or water(aquatic or hydrotherapy).
Hydrotherapy is normally a good fit for those who for any factors may struggle with doing the workouts on land. Whichever one applies to you, research has shown there is no added benefit to doing the exercises on land against having them done in water according to the British Medical Journal.2
What exercises are good for arthritis of the hip?
Without any hip pathology, you could walk into a gym and engage in a wide range of exercises of your choosing. However, with hip arthritis, you lose this privilege. The disease narrows your choice of exercises to a select few drills that have been proven to be beneficial for your condition.
Exercises that are good for hip arthritis are those which when done the right way should:
- Improve the strength of the muscles that control or move the hip joint,
- Improve or maintain the range of movement of the hip joint,
- Improve joint lubrication and blood circulation,
- Maintain joint function and slow down physical impairment.
- Helps you lose weight and maintain your physical fitness.
Some Physical therapy exercises for hip arthritis.
Like, As has been emphasized earlier, exercises that are most ideal for your unique situation have to be prescribed and taught to reduce the risk of arthritic flare-ups. This also ensures you derive the maximum benefits from your therapeutic workouts.
Physiotherapists are professionals whose training places them in the best position to advise you on what exercises to do or avoid after an assessment. Below are some workouts that may be prescribed by your physiotherapist. The first 10 are strengthening drills followed by stretches that are beneficial against hip arthritis and the associated pain.
10 strengthening exercises.
These are designed to strengthen the muscles that move and stabilize the hip joint during movements. Strong muscles take some weight off the joints during use.
1. Hip extension in the prone position:
- Lie face down or prone on a firm surface and support your head with your hands,
- Place a pillow or rolled-up towel at the hips if you feel the need for it,
- Bend the knee of the affected hip so the leg stays vertically up in the air,
- Extend your hip such that your thighs are raised above the surface you are lying on,
- Hold the leg up in that position for 5 seconds, you should feel a firm contraction of your glutes,
- Lower the leg back to the starting position in a reverse movement and repeat for the next repetition.
You may start with 5 repetitions and increase as you improve. You could also use an ankle weight for added difficulty as your strength and confidence improve.
2. Standing hip extension:
This helps to strengthen the gluteus as well but done in a standing position.
- Start by standing upright with your feet at hip-width apart and pointing forwards or slightly outwards,
- You may place a hand or both on something for balance. This could be the backrest of a chair, kitchen sink, dining table edge, or a door frame.
- Brace your tummy, bend slightly forward at the hip but keep a straight back and chest out,
- Transfer your body weight to the left leg,
- Squeeze your glutes as you slowly swing your right leg backward, as much as you can with extended hips but straight knees,
- Hold the right leg in that extended position for about 10 seconds and return it to the starting position, this is one repetition.
Do 5 repetitions on each leg for a start and increase the number of repetitions as you get stronger or the exercise gets easier.
3. Clamshell exercise:
This workout aims to strengthen muscles like the gluteus medius that help to stabilize the hip during use. It also has a pain-relieving effect.
- You start by lying on your side with the affected hip on the upside,
- You could support your head with your hands as shown in the image below but it’s better if your head is supported in a way that the whole spine lies in the same horizontal plane,
- Place the palm of the upper arm on the floor for stability as shown below,
- Bend both legs slightly with the joints of the one above right on top of the one below it,
- Endeavor to see that the upper hip is also vertically above the lower one,
- Separate the legs at the knees by lifting the upper one but keep both feet in touch,
- Hold for 5 seconds and gradually lower the upper knee to rest on the lower one. This is one repetition.
You can do 5 repetitions for each leg for a start and increase the number of repetitions with time.
Note that this exercise, like many others, can also be done with a resistant band placed above your knees in supine lying(lying on your back).
4. Marching while seated:
This is one of the easiest exercises you could do and it strengthens the hip flexors. It should be among the first points of consideration when planning your exercises for arthritis of the hip.
- You start by sitting on a suitable chair or any surface that’s not too high for you to place your feet flat on the ground,
- Sit upright with a straight back and chest out,
- Place your hands on your shoulders or by the sides of your head as shown below,
- Alternately raise each foot from the floor by bending at the hips and lifting as much as you can,
- Hold each foot up in the air for 2-3 seconds each time before lowering it back to the floor,
- You can lift each foot to 5 repetitions to make a set before taking a break,
- Repeat this for up to 5 sets for a start and increase the sets as your fitness level improves.
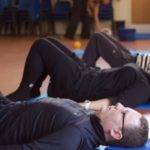
5. Bridging:
This also helps strengthen the glutes plus the core muscles.
- Start by lying on your back, facing up with arms by your sides,
- With your legs kept close to each other, bend both your knees such that your feet are flat on the ground as shown below,
- Brace your tummy and lift your hips off the ground till they are in the same plane with your shoulders and knees as shown below,
- Hold for 10 seconds and relax by lowering the hips back to the ground. That is one repetition.
You can do this for about 5 repetitions and increase that number gradually over time.
Do keep in touch by signing up for our newsletter:
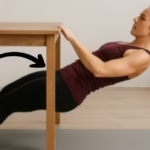
6. Sit to stand:
This strengthens your anti-gravity muscles which include most of the muscles already targeted in the previously described exercises.
- Start by placing a chair behind you that’s so secure that it doesn’t slide out of position during the exercise,
- Stand straight with the edge of the chair close to or touching the back of your legs,
- Your feet should be at hip-width apart though bringing them together has the added benefit of training your muscles for stability,
- Fold your arms or place them across your chest with your palms resting on your shoulders,
- Keep a straight back, and chest out, and brace your tummy,
- Push your hips backward as you bend your hips and knees to sit on the chair,
- Tilt your trunk forward by bending at the hips,
- Pushing through your heels get up from the chair to stand upright in a reverse move. This is one repetition.
Repeat the move to clock 5-10 repetitions and rest. Increase the number of repetitions as your strength improves.
7. Standing hip abduction:
This is one of the easiest exercises you could do though you may need to hold or place your hand on something for support.
- Start by standing upright with your hand holding the backrest of a chair or any stable object for support,
- Feet should be shoulder or hip-width apart, chest out, and brace your tummy,
- Transfer your body weight to one leg and swing the other leg slowly away from you in the same plane with the rest of your body(this is called abduction),
- You may hold the swung leg in abduction for 2 seconds before returning it to the resting position. This is one repetition.
Being a simple exercise you may do 10 repetitions for a start and improve from there.
8. Side lying straight leg raising to the inside:
This is a little bit more complex than most other exercises described earlier but could yield excellent results. It targets a group of muscles called hip adductors which stabilize the hip during active use.
- You start by lying on your side and resting on the affected hip.
- Your head could rest on your hand or be supported with a pillow such that your entire spine is kept in the same horizontal plane,
- Use a chair to prop up the top leg or bend it with its foot placed flat on the ground behind the knees of the leg on the ground as shown in the image below,
- Place the palm of your top arm on the ground in front of your tummy for stability as shown below,
- Brace your tummy and gradually raise the leg that’s resting on the ground towards the ceiling to a height of about 20 centimeters or less,
- Hold the leg in that position for about 2 seconds and lower it back to the resting position. This is one repetition.
If it’s your first time you could do 5 repetitions and increase as it gets easier. Meanwhile, it would help if you watched how your hip responds to it the whole time. The response of your hip could guide you on how many reps you should do.
9. Side lying straight leg raising to the outside:
This is less cumbersome than the straight leg raising to the inside described earlier. It targets a different set of muscles collectively called the hip abductors which include the glutes. These muscles help in stabilizing and controlling the hip during movement. Hip stabilization helps to avoid injuries and mitigate the pain that may come with arthritis of the hip.
- Start by lying on your side with the arthritic hip up,
- Support your head with your arm as shown below or a pillow in a way that keeps your spine in a horizontal plane,
- Use the arm above to stabilize yourself so the two sides of your body are maintained in a vertical plane throughout the exercise,
- Brace your tummy and gently raise the upper leg away from the lower one up to 30 centimeters or as much as you can go,
- Hold the leg in the air for about 2 seconds and lower it back to its resting position on the lower leg. This is one repetition.
You could start with 5 reps for each leg and increase the number of reps over time as it suits you. Another way to build on your gains is to increase the time you keep the raised leg up in the air for endurance or use a resistance band for strength building.
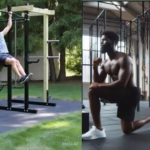
10. Supported body weight squats:
Body weight squats are often done without support with both hands spread out horizontally in front of you. I added ‘supported’ to the term to emphasize the importance of support if you must do this with arthritic hips.
Hip arthritis is a chronic condition with a negative impact on stability. Sufferers are often seniors who must avoid falls since their bones are no longer as strong as they once were.
There was once a patient on whom I laid a lot of emphasis for supported ambulation but he came under pressure from family members to do without his cane and it proved disastrous. He had a fall in the bathroom one morning and I was given a call.
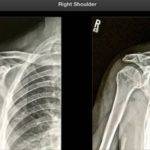
At a glance, on arrival, I could tell from his physical state he had a hip dislocation. A follow-up X-ray revealed he also suffered a hip fracture. We had to arrange for a hip operation and it wasn’t cheap.
So the supported bodyweight squat should be done by holding onto something for support like the backrest of a chair, edge of a table, etc.
- Start by standing upright with feet at shoulder width apart,
- Brace your tummy and look up straight ahead of you,
- With one or both hands holding onto some form of support, push your hip backward as you bend at the hips keeping a straight back throughout the movement,
- Lower your hips as much as you can go,
- Hold for 3 seconds,
- Push through your heels as you extend your hips to rise back into a standing position. This is a repetition.
You could do up to 5 to 10 repetitions and increase or reduce the number according to your fitness level at any point in time.
5 stretches for arthritis in hips.
Stretching exercises help to relax the hip muscles and help them maintain their optimal functional efficiency. They are also known for their hip pain-relieving effect. Below are a few beneficial stretches for arthritis of the hip.
1. Hamstring stretches:
This is similar to the knee-to-chest stretch except you have to extend the knee rather than keep it bent. This gives a good stretch to the hamstring muscles.
- Start by lying supine (on your back),
- Look up straight and bend both knees such that both feet are flat on the ground,
- Lift the target leg off the ground towards your chest and hold the thigh with both hands below your knees,
- Then extend the knee as you gently pull the leg further towards your chest,
- You’ll feel a stretch at the hamstrings,
- Hold for about 20 seconds and relax by bringing the stretched leg down in reverse movement. This is a repetition.
For a start, you can do five repetitions per leg and improve on the count with time.
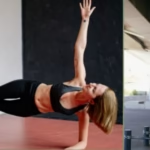
2. Iliotibial band stretch:
This is commonly done in standing and leaning towards a wall to achieve the stretch while making sure you don’t twist at the waist. For someone with arthritis of the hip, I prefer it done in a lying position while the hip isn’t bearing any weight.
- Start by lying on the side close to the edge of a bed or plinth, with the leg you want to stretch on the upside,
- See that your head is well supported with your hand or a pillow,
- Brace your tummy and flex the hip of your target leg so the leg hangs in the air away from the surface you are lying on as shown below,
- Keep the knee extended at all times,
- You’ll feel a stretch on the lateral side of the leg(location of the iliotibial band) as the leg remains hanging under gravity,
- Maintain the position for up to 20 seconds and take the leg back into a resting position in a reverse movement. This represents one repetition.
You can do 5 repetitions on each leg and improve that over time as your symptoms improve.
3. Standing quadriceps stretch:
This can be effectively done in various positions but I’ll describe the one done in the upright posture.
- Stand upright with feet at hip-width apart,
- Place the contralateral hand (the hand on the opposite side of your target leg) on something for support even if it is a wall,
- Look up straight ahead and maintain a straight back at all times,
- Brace your tummy and bend the target knee pulling the foot towards your buttocks,
- At the limit of the active range of the knee bend, grasp the leg at the ankle using the hand on the ipsilateral side (same side ) as the leg,
- Pull the foot further towards your buttocks,
- You’ll feel a stretch in the quadricep muscles,
- Hold for about 20 seconds before releasing the grip and returning the leg to the resting position. This is a rep.
Repeat the movement for up to 5 reps for each leg.
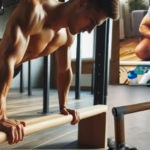
4. Hip flexor stretch in standing:
This targets the iliopsoas muscle which is the primary hip flexor.
- Start by standing upright with feet at hip-width apart and pointing forwards or slightly outwards,
- Hold onto something for support with at least one hand, preferably the hand on the contralateral (opposite) side of the hip you want to stretch,
- Move the target leg backward and bend the knee slightly,
- Start bending the forward leg/knee gently keeping a straight back the whole time,
- Never allow the forward knee to bend to a point it goes beyond the vertical plane of your toes,
- You’ll feel a stretch at the hip,
- Maintain the position for 15 – 30 seconds according to your level of fitness and how comfortable it feels,
- Relax by straightening up again in a reverse movement. This is one repetition.
You can do 5 to 10 repetitions depending on how long you hold when you stretch. The longer you hold the fewer repetitions you’ll need to achieve your goal though all counts can be increased as your fitness level improves.
5. Knee-to-chest stretches:
This is similar to the hamstring stretch described earlier except you do this with a fully bent knee which restricts the hamstrings from getting stretched. You start by lying on your back and follow the exact step described in our earlier article on single leg knee to chest stretch.
Hip arthritis exercises for the elderly.
Exercise is crucial in the prevention of osteoporosis and the maintenance of bone health. However, where there is an existing pathology like arthritis of the hip the type of exercise is as important as the benefits. Hip arthritis exercises for the elderly should be low impact, low intensity, and non-weight bearing.
When done rightly, the benefits of these exercises can be quite significant even in severe cases. Research has shown that hip arthritis exercises can prevent the need for hip replacement surgeries in over 40% of patients according to the Journal of Clinical Medicine.3
Most exercises described above that were done in lying positions are quite suitable for the elderly. In those, the muscles were either stretched or strengthened while the arthritic hip isn’t bearing weight.
It doesn’t mean other forms of exercise can’t apply as it all depends on your fitness level and the severity of the disease as assessed by your healthcare provider. Whatever exercise has been recommended for you as an elderly you’ll need to start slowly, be gentle on it, and continuously monitor how your arthritic hip is responding to it.
Hip osteoarthritis exercises to avoid.
The hip osteoarthritis exercises to avoid will depend on the stage of the disease and the severity of your symptoms. Generally, you are advised to avoid high-impact exercises that put greater stress on the joint thereby aggravating your symptoms. Such exercises include:
- Jumping of any type, be it long or high jump. This is especially so if you are above 40.
- Running,
- Heavy weight lifting, and
- Burpee exercises.
Exercises are so many with most types having varieties of ways they could be done. Your healthcare provider will be in the best position to advise on what workouts you need to abstain from after an assessment of your condition.
I hope this article was helpful. If there is a specific thing or question that hasn’t been covered here but is of interest to you do mention it in the comment section or contact us via email.
- French, H. P., Cusack, T., Brennan, A., Caffrey, A., Conroy, R., Cuddy, V., FitzGerald, O. M., Gilsenan, C., Kane, D., O’Connell, P. G., White, B., & McCarthy, G. M. (2013). Exercise and Manual Physiotherapy Arthritis Research Trial (EMPART) for Osteoarthritis of the Hip: A Multicenter Randomized Controlled Trial. Archives of Physical Medicine and Rehabilitation, 94(2), 302-314. https://doi.org/10.1016/j.apmr.2012.09.030 ↩︎
- Stephanie I Batterham, Sophie Heywood & Jennifer L Keating. (2011). Systematic review and meta-analysis comparing land and aquatic exercise for people with hip or knee arthritis on function, mobility, and other health outcomes. BMC Musculoskeletal Disorders. Volume 12, article number 123. https://link.springer.com/article/10.1186/1471-2474-12-123 ↩︎
- Zampogna, B., Papalia, R., Papalia, G. F., Campi, S., Vasta, S., Vorini, F., Fossati, C., Torre, G., & Denaro, V. (2020). The Role of Physical Activity as Conservative Treatment for Hip and Knee Osteoarthritis in Older People: A Systematic Review and Meta-analysis. Journal of Clinical Medicine, 9(4), 1167. https://doi.org/10.3390/jcm9041167 ↩︎


I bookmarked some of you post as I think they were very useful and beneficial.
What a great site and informative posts, I will bookmark this website?
You are my inspiration , I own few web logs and infrequently run out things to post :(.